Cách tạo lịch trong Excel đơn giản, nhanh chóng
Mục lục nội dung
Trong quá trình làm việc trong Excel bạn cần tạo lịch, nhưng bạn chưa biết cách tạo lịch trong Excel như thế nào. Có rất nhiều cách tạo lịch trong Excel đơn giản để thay thế cho việc tự tạo lịch thủ công trên Excel. Dưới đây ThuThuat123.com chia sẻ với bạn 3 cách tạo lịch trong Excel đơn giản, nhanh chóng, mời bạn cùng tham khảo nhé.
1. Cách tạo lịch trong Excel đơn giản với mẫu có sẵn
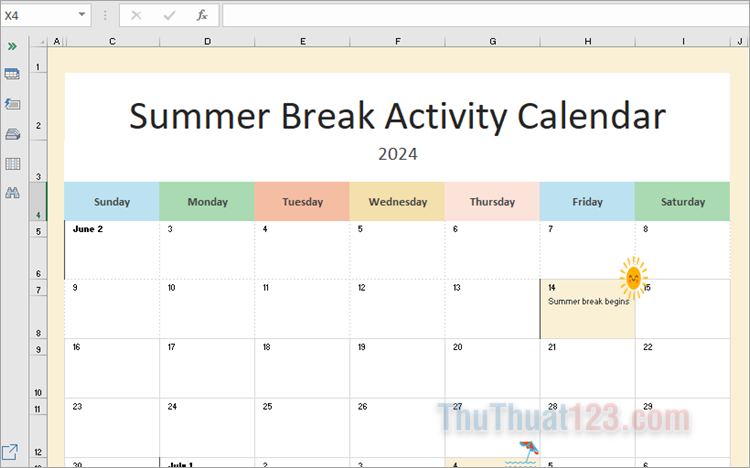
Excel hỗ trợ bạn các mẫu lịch có sẵn với nhiều kiểu đẹp, đây là cách tạo lịch trong Excel đơn giản, nhanh chóng mà bạn có thể tham khảo.
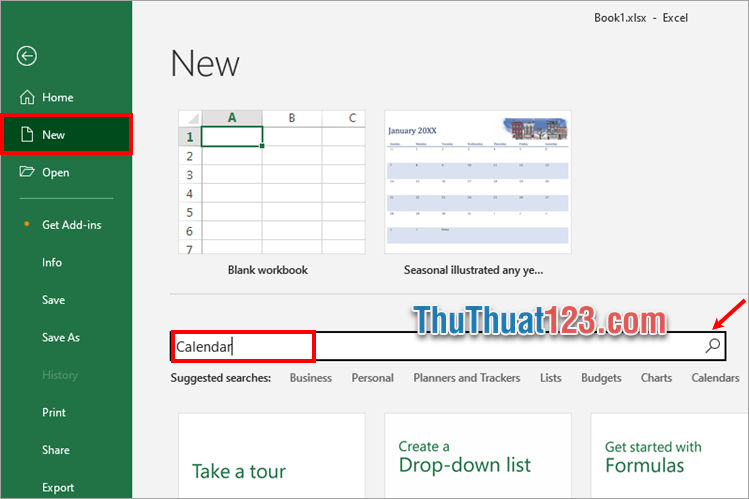
Bước 1: Chọn File → New, trong phần chọn mẫu online bạn nhập Calendar và nhấn tìm kiếm.
Bước 2: Excel sẽ tự động tìm kiếm các mẫu lịch Calendar online, bạn chỉ cần lựa chọn mẫu lịch mà bạn muốn tạo trong Excel.
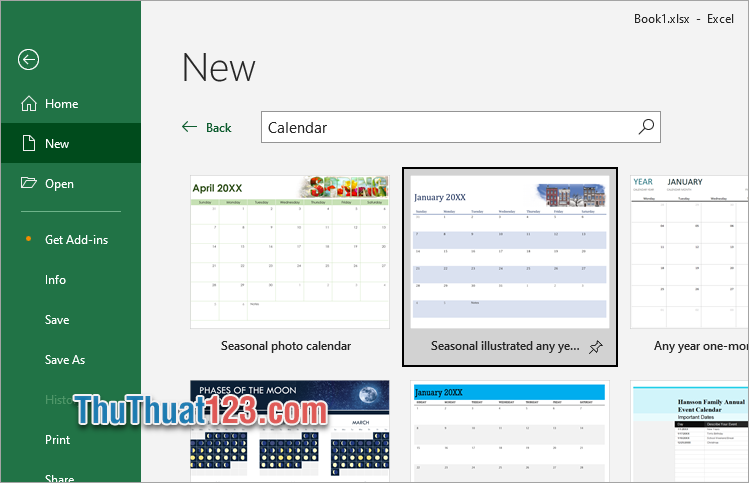
Bước 3: Chọn Create để tạo lịch trong Excel nhanh chóng.
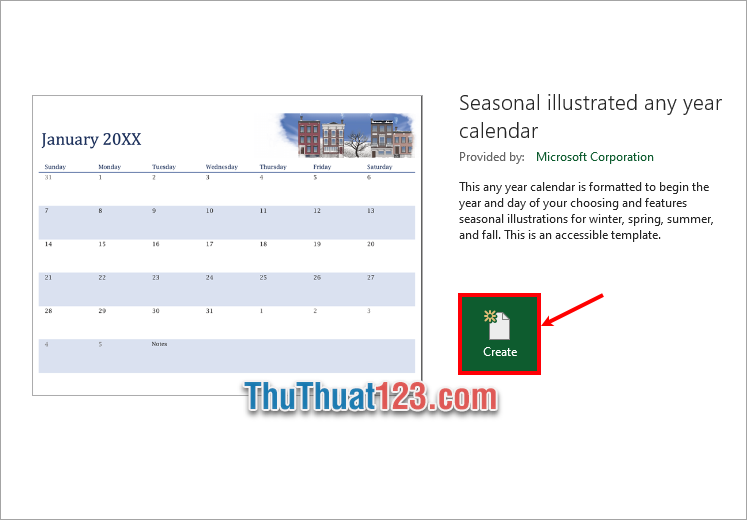
Như vậy một file Excel mới sẽ được tạo, với mỗi sheet là một tháng trong năm.
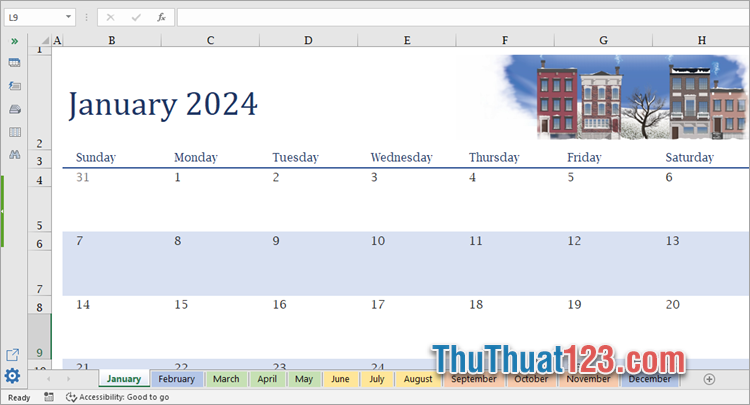
Bước 4: Chỉnh sửa lịch theo ý muốn.
- Thêm sự kiện vào lịch
Dưới mỗi ngày sẽ có một ô trống, bạn muốn thêm sự kiện, lời nhắc, hay những ghi nhớ mà bạn muốn bằng cách chọn ô dưới ngày đó và nhập nội dung bạn muốn.
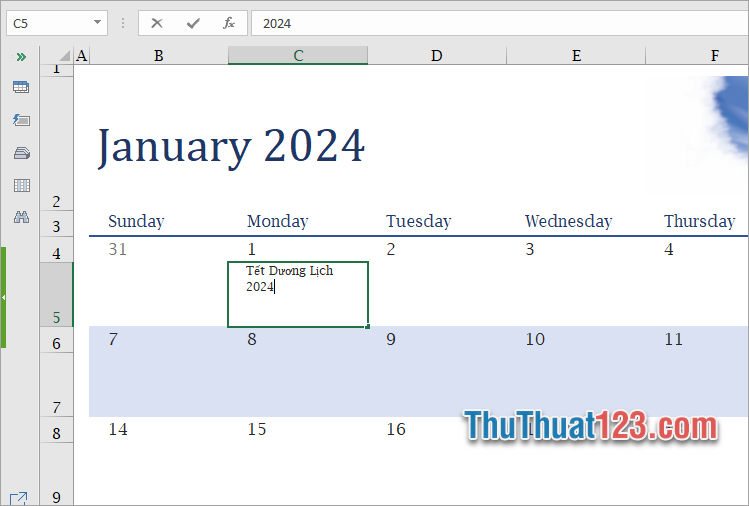
- Thay đổi màu sắc cho chữ hay các ô lịch
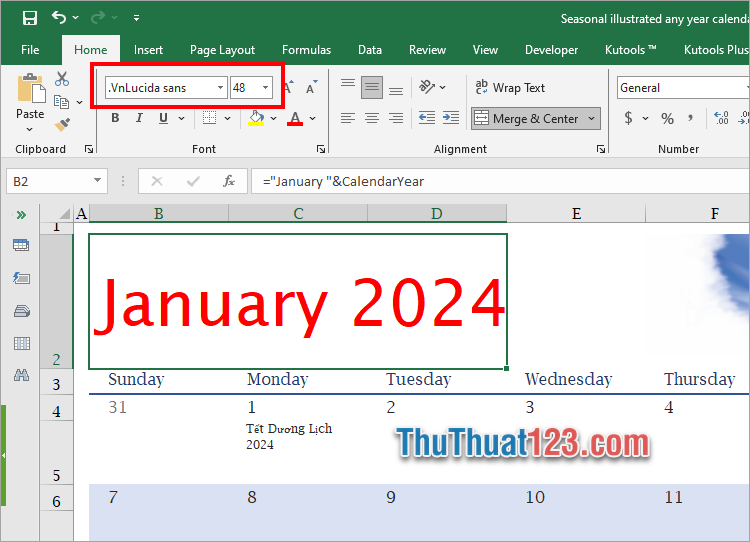
Để thay đổi màu sắc bất kỳ bạn chỉ cần chọn ô chứa chữ hay ô chứa ngày cần thay đổi màu sắc và chọn màu chữ trong phần Font.
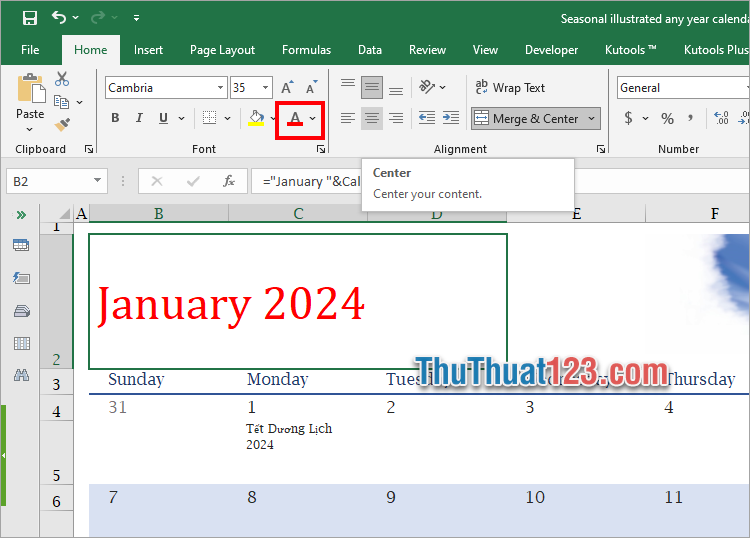
- Thay đổi font chữ, cỡ chữ
Để thay đổi font chữ, cỡ chữ cho tên tháng, tên thứ bạn chỉ cần chọn tên cần thay đổi và thay đổi kiểu chữ, cỡ chữ trong phần Font.
2. Cách tạo lịch trong Excel sử dụng VBA
Ngoài cách tạo lịch trong Excel đơn giản, nhanh chóng với mẫu có sẵn mà Excel hỗ trợ thì bạn cũng có thể tạo lịch trong Excel sử dụng code VBA trong Excel. Để tạo lịch trong Excel đơn giản, nhanh chóng bạn thực hiện như sau:
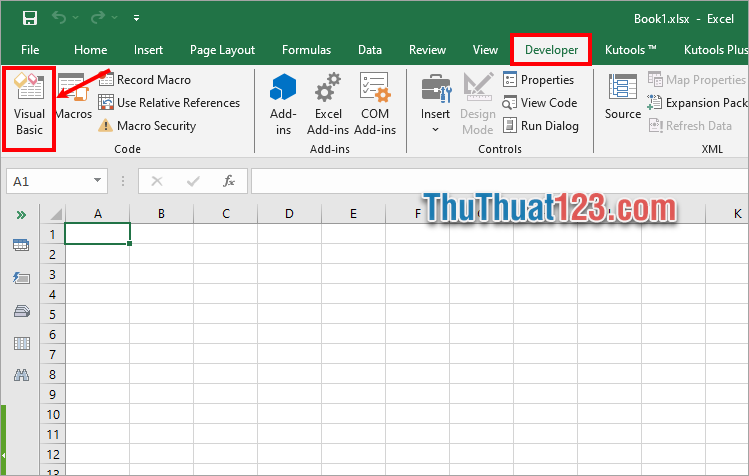
Bước 1: Trên file Excel mà bạn muốn tạo lịch bạn chọn Developer → Visual Basic hoặc nhấn tổ hợp Alt + F11 để mở cửa sổ Microsoft Visual Basic.
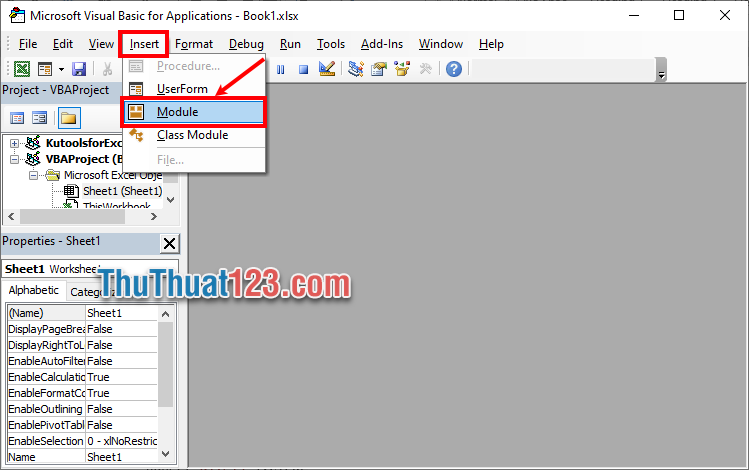
Bước 2: Trong cửa sổ Visual Basic bạn chọn Insert → Module.
Bước 3: Nhập vào khung code của Module vừa tạo mã code dưới đây.
Sub CalendarMaker()
' Unprotect sheet if had previous calendar to prevent  error.
ActiveSheet.Protect DrawingObjects:=False, Contents:=False, _
Scenarios:=False
' Prevent screen flashing while drawing calendar.
Application.ScreenUpdating = False
' Set up error trapping.
On Error GoTo  MyErrorTrap
' Clear area a1:g14 including any previous calendar.
Range("a1:g14").Clear
' Use InputBox to get desired month and year and set  variable
' MyInput.
MyInput = InputBox("Type in Month and year for  Calendar ")
' Allow user to end macro with Cancel in InputBox.
If  MyInput = "" Then Exit Sub
' Get the date value of the beginning of inputted month.
StartDay = DateValue(MyInput)
' Check if valid date but not the first of the month
' -- if so, reset StartDay to first day of month.
If  Day(StartDay) <> 1 Then
StartDay = DateValue(Month(StartDay)  & "/1/" & _
Year(StartDay))
End If
' Prepare cell for Month and Year as fully spelled out.
Range("a1").NumberFormat = "mmmm yyyy"
' Center the Month and Year label across a1:g1 with  appropriate
' size, height and bolding.
With  Range("a1:g1")
.HorizontalAlignment = xlCenterAcrossSelection
.VerticalAlignment = xlCenter
.Font.Size = 18
.Font.Bold = True
.RowHeight = 35
End With
' Prepare a2:g2 for day of week labels with centering,  size,
' height and bolding.
With  Range("a2:g2")
.ColumnWidth = 11
.VerticalAlignment = xlCenter
.HorizontalAlignment = xlCenter
.VerticalAlignment = xlCenter
.Orientation = xlHorizontal
.Font.Size = 12
.Font.Bold = True
.RowHeight = 20
End With
' Put days of week in a2:g2.
Range("a2") = "Sunday"
Range("b2") = "Monday"
Range("c2") = "Tuesday"
Range("d2") = "Wednesday"
Range("e2") = "Thursday"
Range("f2") = "Friday"
Range("g2") = "Saturday"
' Prepare a3:g7 for dates with left/top alignment, size, height
' and bolding.
With  Range("a3:g8")
.HorizontalAlignment = xlRight
.VerticalAlignment = xlTop
.Font.Size = 18
.Font.Bold = True
.RowHeight = 21
End With
' Put inputted month and year fully spelling out into  "a1".
Range("a1").Value = Application.Text(MyInput, "mmmm yyyy")
' Set variable and get which day of the week the month  starts.
DayofWeek = WeekDay(StartDay)
' Set variables to identify the year and month as separate
' variables.
CurYear = Year(StartDay)
CurMonth = Month(StartDay)
' Set variable and calculate the first day of the next  month.
FinalDay = DateSerial(CurYear, CurMonth  + 1, 1)
' Place a "1" in cell position of the first day  of the chosen
' month based on DayofWeek.
Select Case DayofWeek
Case 1
Range("a3").Value = 1
Case 2
Range("b3").Value = 1
Case 3
Range("c3").Value = 1
Case 4
Range("d3").Value = 1
Case 5
Range("e3").Value = 1
Case 6
Range("f3").Value = 1
Case 7
Range("g3").Value = 1
End Select
' Loop through range a3:g8 incrementing each cell after the  "1"
' cell.
For Each cell In Range("a3:g8")
RowCell = cell.Row
ColCell = cell.Column
' Do if "1" is in first column.
If  cell.Column = 1 And cell.Row = 3 Then
' Do if current cell is not in 1st column.
ElseIf  cell.Column <> 1 Then
If cell.Offset(0, -1).Value >= 1 Then
cell.Value = cell.Offset(0,  -1).Value + 1
' Stop when the last day of the month  has been
' entered.
If cell.Value > (FinalDay - StartDay) Then
cell.Value = ""
' Exit loop when calendar has correct  number of
' days shown.
Exit For
End If
End If
' Do only if current cell is not in Row 3 and is in Column  1.
ElseIf  cell.Row > 3 And cell.Column = 1 Then
cell.Value = cell.Offset(-1,  6).Value + 1
' Stop when the last day of the month  has been entered.
If cell.Value > (FinalDay - StartDay) Then
cell.Value = ""
' Exit loop when calendar has correct  number of days
' shown.
Exit For
End If
End If
Next
' Create Entry cells, format them centered, wrap text, and  border
  ' around days.
  For x =  0 To 5
  Range("A4").Offset(x * 2, 0).EntireRow.Insert
  With  Range("A4:G4").Offset(x * 2, 0)
  .RowHeight = 65
  .HorizontalAlignment = xlCenter
  .VerticalAlignment = xlTop
  .WrapText = True
  .Font.Size = 10
  .Font.Bold = False
  ' Unlock these cells to be able to  enter text later after
  ' sheet is protected.
  .Locked = False
  End With
  ' Put border around the block of dates.
  With  Range("A3").Offset(x * 2, 0).Resize(2, _7).Borders(xlLeft)
  .Weight = xlThick
  .ColorIndex = xlAutomatic
  End With
  With  Range("A3").Offset(x * 2, 0).Resize(2, _7).Borders(xlRight)
  .Weight = xlThick
  .ColorIndex = xlAutomatic
  End With
  Range("A3").Offset(x * 2, 0).Resize(2,  7).BorderAround _
  Weight:=xlThick,  ColorIndex:=xlAutomatic
  Next
  If  Range("A13").Value = "" Then  Range("A13").Offset(0, 0) _
  .Resize(2, 8).EntireRow.Delete
  ' Turn off gridlines.
  ActiveWindow.DisplayGridlines = False
  ' Protect sheet to prevent overwriting the dates.
  ActiveSheet.Protect DrawingObjects:=True, Contents:=True, _
  Scenarios:=True
' Resize window to show all of calendar (may have to be  adjusted
  ' for video configuration).
  ActiveWindow.WindowState = xlMaximized
  ActiveWindow.ScrollRow = 1
' Allow screen to redraw with calendar showing.
  Application.ScreenUpdating = True
  ' Prevent going to error trap unless error found by exiting  Sub
  ' here.
  Exit Sub
  ' Error causes msgbox to indicate the problem, provides new  input box,
  ' and resumes at the line that caused the error.
  MyErrorTrap:
  MsgBox "You may not have entered your  Month and Year correctly." _
  & Chr(13) & "Spell the Month correctly" _
  & " (or use 3 letter  abbreviation)" _
  & Chr(13) & "and 4 digits for the Year"
  MyInput = InputBox("Type in Month and year for  Calendar")
  If  MyInput = "" Then Exit Sub
  Resume
  End Sub
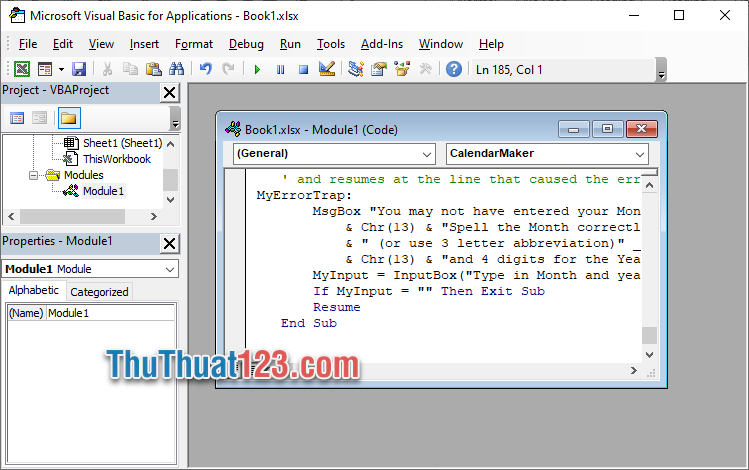
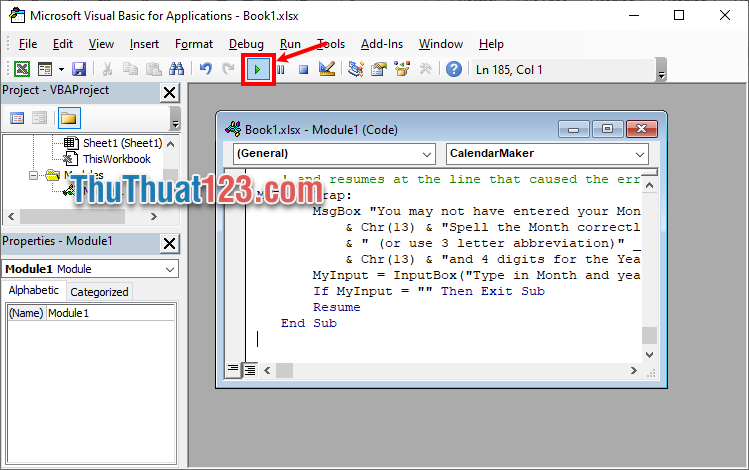
Bước 4: Nhấn chọn biểu tượng chạy hoặc phím F5 để chạy Module.
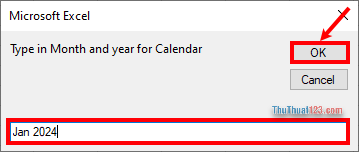
Bước 5: Xuất hiện một hộp thoại nhỏ bạn nhập tháng và năm cần tạo lịch trong Excel, lưu ý tháng là viết tắt của từ tiếng Anh, sau đó nhấn OK.
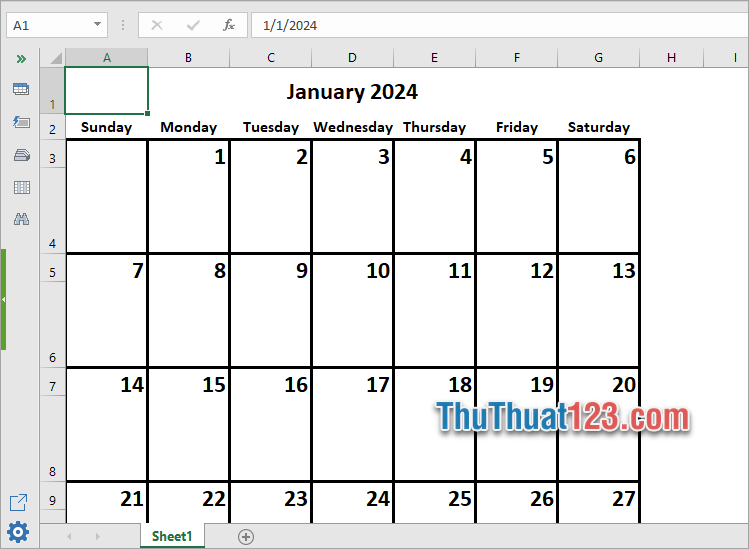
Kết quả bạn sẽ được như sau:
3. Cách tạo lịch trong Excel Kutools for Excel
Kutools for Excel cung cấp hơn 300 tính năng nâng cao để đơn giản hóa công việc Excel của bạn, Kutools for Excel hỗ trợ tạo lịch trong Excel dễ dàng, nhanh chóng. Nếu bạn chưa tải và cài đặt tiện ích bạn có thể tải tại đây: https://vi.extendoffice.com/download/kutools-for-excel.html. Sau khi tải và cài đặt Kutools for Excel bạn thực hiện cách tạo lịch Excel đơn giản, nhanh chóng với các bước sau:
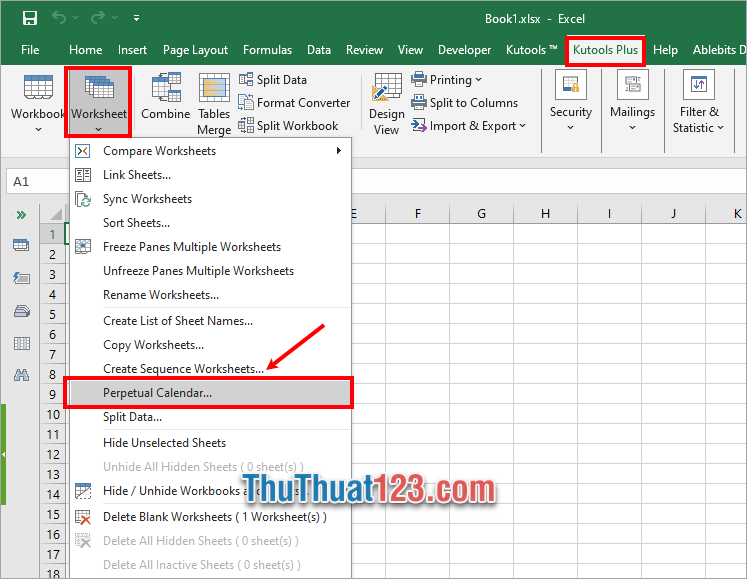
Bước 1: Trên file Excel bạn chọn thẻ Kutools Plus → Worksheet → Perpetual Calendar.
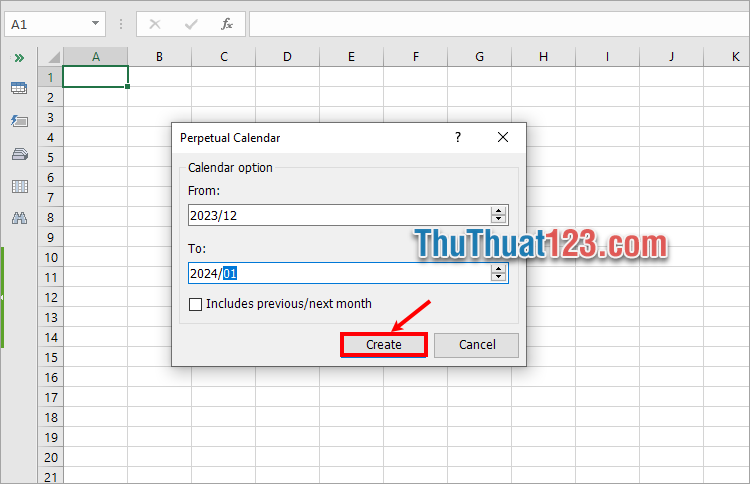
Bước 2: Xuất hiện hộp thoại nhỏ bạn chọn tháng năm bắt đầu tạo lịch trong phần From, tháng năm kết thúc trong phần To, sau đó chọn Create.
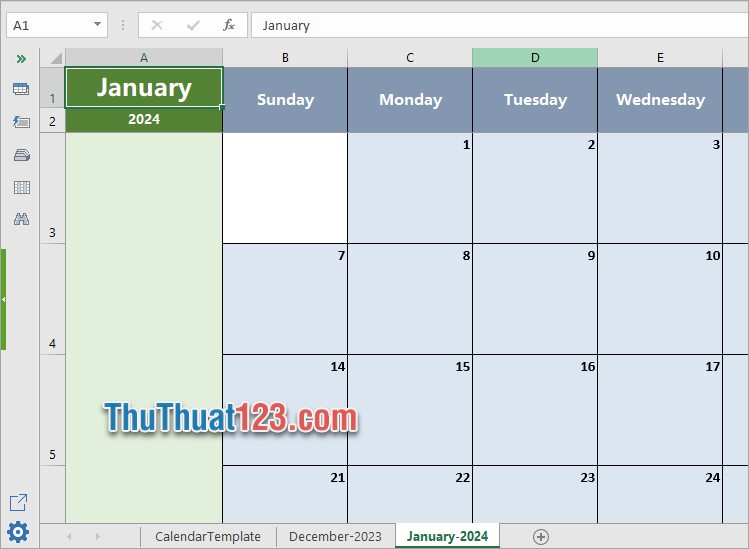
Như vậy các tháng trong khoảng thời gian bạn chọn sẽ được tạo lịch, mỗi tháng trong một sheet của file Excel mới.
Như vậy bạn đã vừa tham khảo các cách tạo lịch trong Excel đơn giản, nhanh chóng mà ThuThuat123.com chia sẻ với bạn. Từ giờ bạn sẽ không cần tốn nhiều thời gian, công sức của mình để tự tạo lịch trong Excel một cách thủ công nữa. Hi vọng bài viết này sẽ giúp ích cho bạn khi bạn cần tạo lịch nhanh chóng. Cảm ơn bạn đã quan tâm và theo dõi bài viết này.


